Tag Archives: frugal cooking

Easy weeknight roasted chicken and potatoes

Most people think of roasted chicken as a fancy Sunday dinner. The truth is, it’s so simple that you can easily make it on a busy weeknight. The price averages 89 cents a pound at my grocery store, which makes it a pretty frugal meal, too, since we always have leftover dark meat to use in other meals like quesadilas or chicken enchilada soup.

It’s not a quick meal compared to other “quick-fix” recipes — it usually takes about an hour to roast a 5-pound chicken at 400 degrees. But it’s very hands-off. Prep the chicken, and the oven does the work for you.

Here’s Tony’s no-fuss method for roasting chicken with a bonus side dish recipe for roasted rosemary potatoes.

Easy roasted chicken

  • 5-8 pound whole chicken
  • Kosher salt
  • Fresh ground black pepper
  • Dried rosemary
  • Dried thyme
  • Extra virgin olive oil

Rinse and thoroughly dry the chicken. Place chicken with breast-side up in a roasting pan or cast-iron skillet (we prefer the cast-iron skillet, because it makes cleanup easier). Coat chicken with olive oil. Cover with salt, pepper, rosemary, and thyme. Roast at 400 degrees for about an hour or until internal temperature of thigh meat is 165 degrees and juices run clear.

If you’ve never carved a whole bird before, this video will provide you with far better instructions than I could give you.

Roasted rosemary potatoes

  • 1 pound potatoes
  • Extra virgin olive oil
  • Kosher salt
  • Black pepper
  • Dried thyme
  • Dried rosemary

For this recipe, I prefer to use thin-skinned potatoes like yellow or red potatoes, because they don’t require peeling. This makes things much easier and quicker.

Wash potatoes, and chop into large bite-sized pieces for faster cooking. Spread potatoes in one layer on a baking sheet. Coat with olive oil, salt, pepper, rosemary, and thyme. Roast in 400-degree oven for 25 minutes, turning potatoes halfway through cooking.

If you’ve never roasted a whole chicken, you MUST try it. It is so simple and delicious. It’s one of our favorite go-to meals, and there’s always enough meat left over for at least one more meal later in the week. Plus you can reserve the carcass for homemade chicken stock.

Chicken and broccoli stir fry

Every once in a while, I get a craving for Chinese food. What I do not crave, however, is the MSG and other generally yucky stuff in Chinese takeout. I’d also prefer not to spend a third of our weekly grocery budget on one meal.

We found this recipe one night when I was craving Chinese, and it’s since been added to our regular meal rotation. We modified it to cut out some of the pricier ingredients. It seems like a long list, but most of these ingredients are things we keep around the house anyway. Since it requires such a small amount of Hoisin, a single bottle (purchased from the international food aisle in the grocery store for around $3) can be used for several different meals.

This homemade version is healthier than Chinese takeout, and even more delicious. Enjoy!

Chicken and broccoli stir fry

  • 2 chicken breasts
  • 1 bunch of broccoli
  • 2 cloves of garlic, minced
  • 1-inch of ginger, peeled and minced
  • 1 Tbsp. corn starch
  • 2 Tsp. hoisin sauce
  • 2 Tbsp. low-sodium soy sauce, plus more for marinating
  • ½ cup vegetable stock (or water)
  • ½ tsp. crushed red pepper flake (adjust for taste)
  • 2 Tbsp. vegetable oil
  • Salt & freshly cracked black pepper
  • 1 ½ tsp. brown sugar (optional)
  • Sesame seeds (optional)

Cut the chicken into cubes and marinate in a small portion of soy sauce (approximately 2 Tbsp). Set aside. Chop the broccoli into bite-sized florets, then peel the stems, cutting the stems into half-moons. Stir together the corn starch, vegetable stock, soy sauce, hoisin, red pepper flake, and brown sugar.

Heat 1 Tbsp. of vegetable oil in the bottom of a wide skillet or wok. Put the chicken into the skillet, sprinkle with black pepper, and cook until entirely done. Remove from the skillet and set aside.

Add the other 1 Tbsp. of vegetable oil if necessary and sauté the broccoli, stirring constantly. When the broccoli begins to turn bright green, add the garlic and ginger. Continue stirring until the broccoli is slightly softened, bon’t overcook the broccoli or allow the garlic to burn. Remove from the skillet and set aside.

Add the sauce to the skillet and allow it to come to a simmer. Once the sauce is thickened, stir in the broccoli and chicken and cover in the sauce. Sprinkle with sesame seeds and serve over rice.

Photo credit

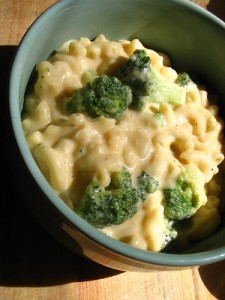
What’s Cookin’ Wednesday: Broccoli and cauliflower mac and cheese

This is one of our favorite go-to comfort food recipes. Who doesn’t love homemade macaroni and cheese? While adding fresh vegetables to the dish doesn’t counteract the butter, cheese, and whole milk, it does add lots of nutrients and flavor, and it’s a great way to sneak some veggies into a picky kid’s diet.

This recipe was originally inspired by a very similar recipe for cauliflower mac and cheese from Real Simple. Tony simplified it a little, and fattened it up for flavor, but you could easily use reduced fat cheese and 1% milk to make it a little healthier.

Broccoli and cauliflower mac and cheese

  • 12 oz. macaroni (or another short tube pasta)
  • 1 head of cauliflower
  • 1 bunch of broccoli
  • 4 Tbsp. unsalted butter
  • 1/4 cup all-purpose flour
  • 1 cup whole milk
  • A pinch of grated nutmeg
  • 8 ounces of sharp cheddar, shredded
  • 1/4 cup bread crumbs or Panko
  • 1/4 cup grated Parmesan cheese
  • 1 Tbsp. dried parsley
  • Kosher salt and fresh ground black pepper

Bring a gallon of water to boil over high heat in a large pot as you cut the cauliflower and broccoli into florets. Generously salt the water once it has reached a boil.

In a medium-sized saucepan, melt the butter over medium heat. When the butter is melted, pour in the flour and stir until it and the butter form a roux (a thick paste). Add the milk slowly, stirring regularly. Allow the mixture to come to a simmer. Sprinkle in the pinch of nutmeg. Once the liquid has become thick and creamy, lower the heat. Stir in the cheese one handful at a time.

Cook the pasta in the boiling water until it is close to al dente. Add the broccoli and cauliflower to the boiling pasta and stir them all together. Let the vegetables boil with the pasta for two to three minutes, or until the broccoli has turned bright green and the cauliflower has begun to soften. Strain everything into a colander.

Place the pasta and vegetables back into the pot, pour in the cheese sauce, and stir to combine. Add plenty of black pepper. Transfer to a large casserole or baking dish. Top with the bread crumbs, parsley, and Parmesan.

Bake in a 350-degree oven for 20 minutes. Let it rest for 5 to 10 minutes before serving.

Photo credit

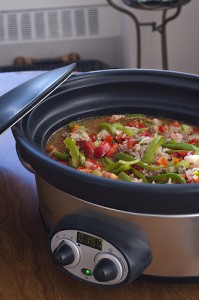
Crock pot cooking saves time & money

I’m suffering from a lack of inspiration this week. I’m tired. Judah is teething. Things have been a little rough lately. So forgive me for phoning it in a little on this one, but lately I’ve been having a love affair with my crock pot.

I’ve always thought of the crock pot as a fall/winter thing, but my love affair with mine started during this summer’s intense heat wave. We were having issues with our air conditioner, and the house just wasn’t getting as cool as we wanted. We couldn’t bear the thought of turning on the oven, and my husband (the cook in our family) didn’t want to stand over a burning stove top in the kitchen. Enter the crock pot.

We started buying large cuts of meat, slow cooking them in the crock pot, and using the meat in dishes throughout the week. Sandwiches, salads, soups, quesadillas. The possibilities were endless. Now as we enter the cooler season, I’m thinking about soups and stews and roasts and other winter comfort food that will be a snap to prepare in our beloved crock pot. It makes me wish we’d started using the thing years ago.

Here are a few of the reasons why I love it so much:

It’s easy.

Just chop and drop your ingredients in the morning (or before you go to bed), and when you get home dinner is ready to serve. Simple!

It uses less energy than the oven.

Even though the crock pot cooks for longer, it doesn’t use the massive amounts of energy it takes to heat an entire over to 300-400 degrees. So it will lower your energy bill (slightly).

It doesn’t heat up the kitchen or the house.

While most people think crock pot = winter comfort food, we started using ours in the summer time to avoid the heat generated by the oven and stove top.

It allows you to buy and cook cheaper cuts of meat without sacrificing flavor.

The process of slow cooking breaks down and softens up cheap cuts of meat that would otherwise be tough. That means you can stretch your grocery budget and still eat delicious meals.

It makes the house smell glorious.

There is nothing better than walking in the door to a house the smells of delicious roasted meat or soup. Trust me.

You can make more than you think with a crock pot.

I have an entire pinboard on Pinterest devoted to crock pot cooking, and I’ve been shocked at how many different recipes you can make. It’s not just soup and roasts. The crock pot can make it easier to prepare pasta dishes, casseroles, dips, and even drinks and desserts.

What’s your favorite crock pot recipe or web site? I’m always looking for new ideas!

Photo credit

Recipe inspiration from Pinterest

Everyone has been buzzing about Pinterest for a few months now. I spend way more time on the site than I probably should, but I’m sad to admit that I don’t have nearly enough time to actually act on the inspiration I find there. I’m constantly repinning ideas for crafts, home decorating, and brilliant life hacks, but I’ve recreated almost none of them.

Menu planning is the one area where I do act upon the inspiration I find on Pinterest. It takes no effort to glance at the recipes pinned by the people I follow and repin what looks good a few times a day. On grocery day, I look through the ideas, and there’s always something that inspires me.

Now that I’m on a high-protein, vegetable-heavy, low-carb kick (I’ve lost 7 pounds so far!), it’s been harder for me to find good, frugal recipes that fit my dietary restrictions. This is why Pinterest has been so helpful! The people I follow share a ton of great ideas for easy, healthy, low-carb meals. (They also share a ton of ideas for sinfully delicious desserts that I repin in the hopes that I’ll someday hit my goal weight and enjoy those things on occasion again.)

This week, I was thrilled with the recipes I found on Pinterest, and four out of seven meals we’re cooking were inspired by recipes pinned on the site. I wanted to share them with you in case you’re looking for frugal, healthy meals that don’t require a ton of ingredients or time.

  • Healthier General Tso’s Chicken – I’ve been craving Chinese food, and this recipe is a simple, easy way to kick up traditional stir fry. It has more sugar that I should be eating, but we’re adding extra veggies to counteract the sugar content.
  • Rosemary Chicken – I have a huge fresh rosemary plant growing in front of my house that I’ve barely touched this season, so I was thrilled to find an opportunity to use some of it up. We’re pairing it with a fresh romaine side salad and this roasted broccoli to amp up our vegetable intake.
  • Crockpot Chicken Enchilada Soup – We’re making a few adaptations to this recipe since we’re trying to avoid processed foods. It calls for canned enchilada sauce and cream of chicken soup. We’ll make our own enchilada sauce and use a combination of milk and chicken stock instead of canned soup. Hopefully it will turn out as good as it looks!
  • Basil Chicken with Vegetables – This is another skillet stir fry that will allow me to use up some of my homegrown herbs. I’m trimming basil by the handful every week to keep it from flowering, and I haven’t been able to use it as quickly as it’s growing. Again, we’re loading it up with more veggies than the recipe recommends.

If you haven’t signed up for Pinterest yet, I highly recommend it. It’s honestly the most useful social network I’ve ever joined. Sure, there’s still the time suck factor, but the ideas really motivate me to try new things in the kitchen. And hopefully someday I’ll find the time to make some of the awesome crafts and life hacks I find there, too.

Are you on Pinterest? Follow me here, and share your username in the comments so I can follow you!

Photo credit

Dairy-free coconut milk ice cream (you won’t even miss the dairy, I promise)

Summertime = ice cream. Obviously. So now that summer is here, and Judah still doesn’t seem to be tolerating dairy in my diet, I was understandably bummed about it.

I looked at the “ice cream alternatives” in the grocery store — there are soy, rice, almond, and coconut milk varieties — but I sort of dragged my feet about trying them. I viewed them the same way I view “dairy-free” cheese. What’s the point? If it’s only going to remind me how much I want the real thing, then I might as well just skip it.

After some cajoling from Tony, I finally agreed to try coconut milk ice cream. No dairy. No soy. Still pretty high in fat and calories, so you can’t eat a pint every night without putting some junk in your trunk, but it’s okay as an occasional treat.

I tried it, and I FELL IN LOVE. Coconut milk ice cream is absolutely delicious. I didn’t miss the dairy at all. It tasted rich and smooth just like real ice cream, and the slight hint of coconut flavor just made it all the more delicious — and I’ve never been a huge fan of coconut in large quantities.

The only problem? Coconut milk ice cream is not frugal. Not even a little bit. We can usually get two quarts of premium ice cream for $2.50. A pint of coconut milk ice cream will cost you at least double that, and usually closer to $6. For a single pint.

Because my husband is a saint — and because he missed ice cream, too, but didn’t dare try to eat it in front of me — he found this recipe for chocolate coconut milk ice cream. We made a few alterations to make it more affordable (agave syrup may be healthy, but it’s pricey). Here is our version of the recipe:

Chocolate Coconut Milk Ice Cream

3 cups of unsweetened coconut milk (two cans)
2/3 cup of cocoa powder
8 tablespoons simple syrup
1 teaspoon vanilla extract
6 tablespoons brewed coffee, cold

Mix ingredients together until smooth. Cover and refrigerate overnight. Add cold coffee. Follow your ice cream maker’s instructions to turn the mixture into ice cream. Serve immediately as “soft serve,” or freeze overnight for firmer ice cream.

We paid about $3 for the coconut milk and pennies for the small amounts of sugar, vanilla extract, and coffee included. It yielded about a quart and a half of coconut milk ice cream for about half the price of a pint in the grocery store. I’m excited to try all kinds of variations on this recipe, including vanilla and coffee flavors and all kinds of mix-ins.

Photo credit

Life-changing chocolate banana smoothie

One of my favorite indulgences is the Starbucks Banana Chocolate Vivanno. Sadly, I no longer live near a Starbucks (probably a good thing since my frequent cravings would lead me to drink lethal amounts of decaf and cost us a fortune).

The good news is I stumbled across this recipe in Real Simple magazine a few months ago. (I can’t find a link, but I know it was in the magazine, maybe in March?). It’s so simple, absolutely delicious, and it tastes just like the Banana Chocolate Vivanno for a fraction of the price.

For two servings:

  • 1 1/2 cups milk
  • 2 tablespoons cocoa powder
  • 1 banana
  • 1 cup ice
  • Blend until smooth.

To really mimic Starbucks, add some coffee or espresso, but you’d have to experiment with the flavor to get it right. Tony and I add vanilla yogurt to thicken it up. You could also add powdered protein or fiber to give it a little more nutritional punch.

I think this may be the official drink of my pregnancy.

Photo by roboppy

Healthy eating on a budget

This is a guest post by Jennifer, who blogs about frugal and simple living at her blogs Getting Ahead and Our Suburban Homestead.

When Karen asked for guest posts to run while she was in Europe, I knew I had to help. I love her blog and find that we have many similar frugal thoughts. She covers frugality so well, that I thought I would write about something else – healthy eating on a budget. Not everyone can afford to eat all organic foods. While that is the healthiest, it can seem a little drastic. Here are some of things we do to eat a healthier diet while still staying within my $400 a month grocery budget for 6 people.

Read labels.

Reading labels is not hard exactly, but it can seem tedious. Grocery shopping will take longer at first, but once you figure out the items that fit into your new ideals you can just check the label every now and then to make sure nothing has changed. I started reading labels when my daughter was diagnosed with a dairy and egg allergy, so I have been doing it for 9 years now. The things I look for have changed over time. At this point we avoid artificial colors, high fructose corn syrup, dairy and eggs. Yes, even with all those restrictions we still have plenty of options out there. Most people don’t think they have options, but they really do. Cutting out the fake stuff like HFCS and artificial colors is one of the best things you can do for your health. And it only requires buying a different brand many times.

Get back to the basics.

I was somewhat forced into this because of the food allergies, but cooking basic foods with common, basic ingredients is a great way to save money. All those fancy boxes that make a meal are off limits for us. But I can create great meals myself. For instance a dinner might consist of grilled chicken, cous cous and a salad. Another night we might have spaghetti (whole wheat noodles and homemade sauce) and green beans. The fancier a meal is the more it costs.

The fewer ingredients the better.

This goes back to reading labels. If the ingredient list takes up half the box the chances are higher that it has fake stuff. For example Club Crackers have a dozen or so ingredients. Triscuits have 3 or 4. Triscuits stick to the basics in their products. The price is virtually the same.

Grow your own food.

We have a garden at our house and this year I also have a community plot as well. I can or freeze the excess produce to eat all year. That spaghetti and green bean meal from above was made from tomatoes and green beans from my garden. Even if you don’t have a ton of space, you can usually grow something. Container gardening and square foot gardening both provide lots of fresh veggies in a small amount of space. The cost is less and the produce is more nutritious.

Pick your battles.

This is why we avoid HFCS and artificial colors. I could have picked other things, or more things, but I feel pretty good about being able to avoid these while still getting foods that my daughter can eat. If we didn’t have to work around her food allergies I could avoid other things too, but it becomes really difficult at the moment. For me this means that many things I have to buy organic if I am going to buy it all. Many things I just don’t buy. Who needs all that processed junk food anyway? Your battles will probably look different from mine and that is fine.

Look for alternative sources.

I found a great local farm that sells farm fresh eggs for $2 a dozen. You can’t beat that and they are delicious. I have also found a great CSA we are joining this year that will provide organic veggies, fruits, meats, milk, bread and cheese. Check out Eat Local for local sources in your area. If you buy in bulk you can frequently get the good foods for the same price as the grocery store foods.

Stock up when things go on sale.

Organic food items go on sale too. They won’t be free, but they are much cheaper than full price this way. So when the organic ketchup went on sale for half price in February, I bought four bottles. This saves me money in the long run.

By combining these methods I am able to feed my family better foods for less money. We are eating healthier than ever before and thriving because of it. Take the time to figure out a plan for your family and you can too.

5 surprisingly simple foods to cook from scratch

Convenience foods have become a way of life for many families. You can purchase most things ready-made — even whole meals. Cooking from scratch may not always save a lot of money, but it’s a great way to eat healthier and cut out artificial ingredients. I think you’d also be surprised at how simple and rewarding cooking from scratch can be.

Here are the recipes we use for five common convenience foods. Even if you can’t cook them from scratch every time, consider trying out these recipes on a weekend to cut down on artificial ingredients and increase flavor.

Chicken stock

Buying ready-made chicken stock is incredibly pricey compared to the cost of cooking it from scratch, and huge amounts of sodium and preservatives make boxed chicken stock less than healthy. Cooking chicken stock from scratch is time consuming, but we make it in bulk and freeze one-quart portions so we’re only making it once every few months. Next time you roast a whole chicken, don’t throw the bones away. Freeze them, and use them on this chicken stock recipe when you have the time.

Pizza dough

Homemade pizza is a great frugal treat for the weekends, but store-bought pizza crust can cut back on your savings. Pizza dough is surprisingly easy to make, especially if you have a stand mixer on hand. Start with this recipe, but you’ll likely end up adapting it to suit your own tastes. If you don’t have a stand mixer, you can always mix and knead your dough the old fashioned way — by hand.

Marinara sauce

If you’re trying to cut artificial ingredients and preservatives out of your diet, there’s no reason not to make your own marinara sauce. It is simple, almost as fast as pouring the ready-made stuff out of the can, and much more delicious. My husband just sautes a little onion and garlic in olive oil and then mixes a large can of organic crushed tomatoes, a tablespoon of tomato paste, salt and pepper, and adds basil, oregano and parsley and a pinch of red pepper flakes to taste. It takes about 15 minutes.

Bread

It took us some time to get the hang of homemade bread, but it is so worth the trouble. The big secret? Bread flour. Really, that’s all there is to it. Any other flour makes the bread too dense and the crust too stiff. We got this recipe from a bag of Pillsbury bread flour, and it turns out perfect every time. Just store it in a plastic zip bag or freeze it for later.

Ice Cream

Homemade ice cream is one of our favorite treats for summer. We were lucky enough to be given a KitchenAid stand mixer with an ice cream maker attachment for our wedding, and this chocolate ice cream recipe is our favorite. But there are tons of simple ice cream recipes out there that don’t require special equipment, such as this ice cream in a bag recipe. Gourmet ingredients can add up, but if you save this treat for special occasions, it’s worth every penny.

What are your favorite recipes to cook from scratch?

Photo by anjuli_ayer